
CMSC 389E:
Digital Logic Design Through Minecraft
Installer (Recommended)
- Download and run the installer located at downloads/installer.jar. The installer is also available as a java file at downloads/Installer.java. (Compile and run with javac)
- Open the Minecraft Launcher and ensure you have selected the 'forge' profile from the dropdown.
- Click the 'Mods' dialog box and verify whether or not you have installed the circuitry mod.
- (If the mod is not installed, head on down to the manual installation instructions and that should get you up and running)
Manual Installation Instructions
"Because sometimes, things happen"
- Purchase the Minecraft: Java Edition from minecraft.net/en-us/store/minecraft-java-edition. It is imperative that you do not purchase any version other than the Java Edition. Our class framework only functions with the Java Edition of the game.
- Download your copy of Minecraft: Java Edition from minecraft.net/en-us/download. Minecraft is available for Windows, MacOS, Debian Linux, and Arch Linux. (Side note: we cannot guarantee full functionality of this modification on Arch Linux. If you are running Arch or another distribution, please contact an instructor via Discord or ELMS.)
- Run the Minecraft: Java Edition launcher at least once. Ensure that you can log in using the account you created, thusly verifying your purchase went through. This will ensure that it generates the required program files for our mod to properly interact with. Do not skip this step!
- Download and run the recommended installer from files.minecraftforge.net/maven/net/minecraftforge/forge/index_1.15.2.html. The button you want to click should look something like the following:
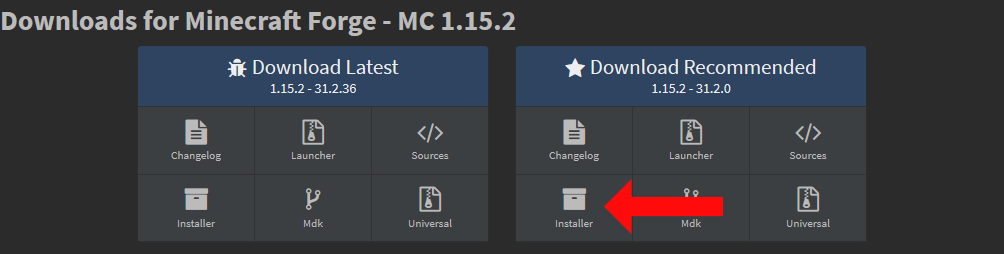
Ensure that the forge installer runs correctly, and identifies your installation of Minecraft. - Open Minecraft and select 'forge' as your profile on the launcher screen. Start the game with the 'forge' profile selected and wait for it to finish loading.
- Click the 'mods' dialog on the game's home screen. Next, on the mods screen, click 'Open Mods Folder'.
- Navigate to github.com/CMSC-389E/mod-and-testing-framework/releases and download the latest version of the mod.
- Save this mod file as is (it should be called circuitry.jar) and move it into the Mods folder you opened in the previous step.
- Restart the game and navigate to the 'mods' screen. Ensure that the CMSC389E Circuitry Mod has been installed.